יום ראשון, 31 בינואר 2016
יום חמישי, 28 בינואר 2016

יום רביעי, 27 בינואר 2016
Hi-key fun
How about a little hi-key fun… Let's start with a simple color portrait.

Now you will want to click on the Adjustment Layer at the bottom of the Layers panel… choose Channel Mixer. Make sure to put the change the Output Channel to gray and then move the sliders to get a pretty good color conversion. It won't be a perfect hi-key look in one shot, so don't stress out.
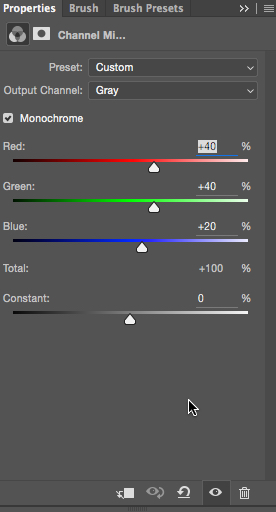
Here is the result of the first Channel Mixer adjustment layer.

Now to make it lighter, simply use Command- (PC Ctrl-J) to make a copy of the adjustment layer and then simply change the blending mode of that layer to Screen. See in the image below that everything lightens up. Now according to your base image, some parts may look better darker, such at the hair, so you can easily make a layer mask on this layer and paint with black to hide some of the screen mode's impact… but that is completely up to you.

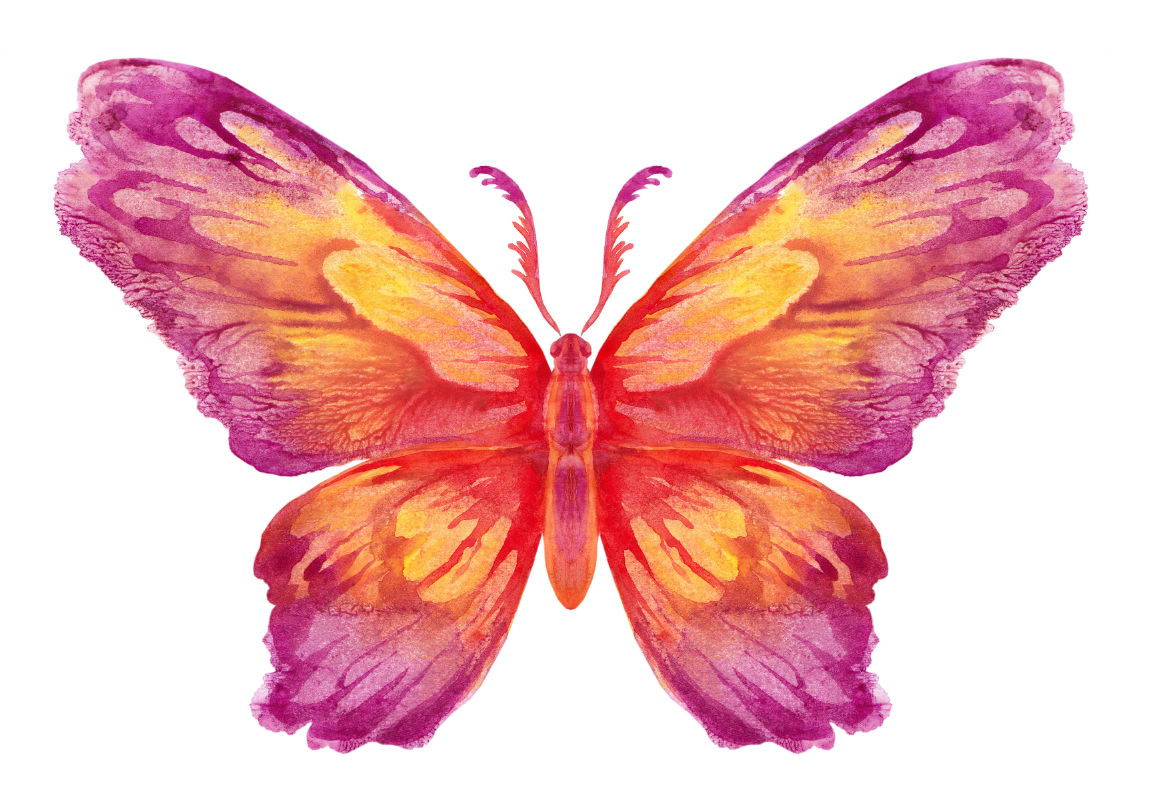
Now to add a little something extra… find a colorful animal, flower or whatever you would like. This is just a simple jpg from Adobe Stock.
Now you will want to drag and drop it, or copy and paste it onto a new layer. Use your Free Transform Command-T (PC Ctrl-T) to reshape the image over the face… you may want to right-click on it and use Warp to help add a little contour to follow the shape of the nose and eyes. Hit OK when you have it place how you like it.
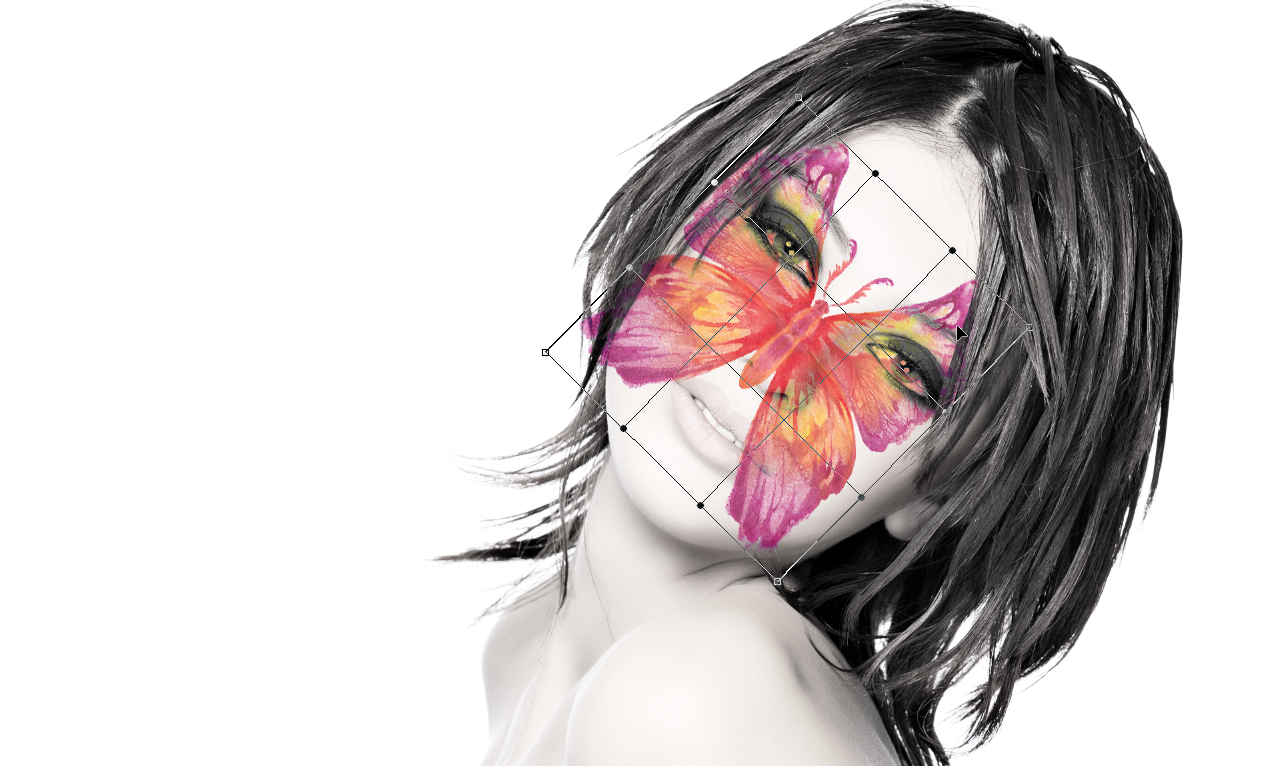
The butterfly is hitting parts of her hair and covering the whites of her eyes… so you will want to mask those parts out.
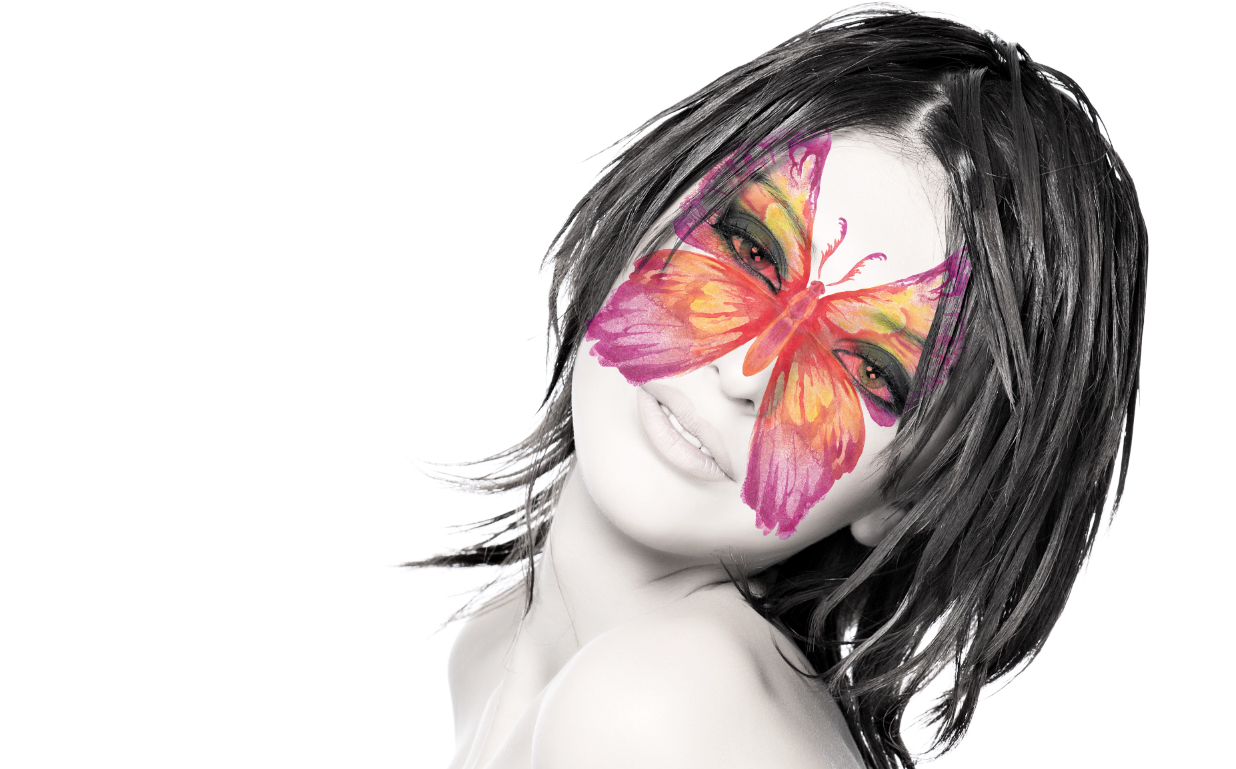

You can also use a low opacity brush on the mask to fade areas of the butterfly to give it a more subtle look… think about how the light would hit the cheeks, etc…
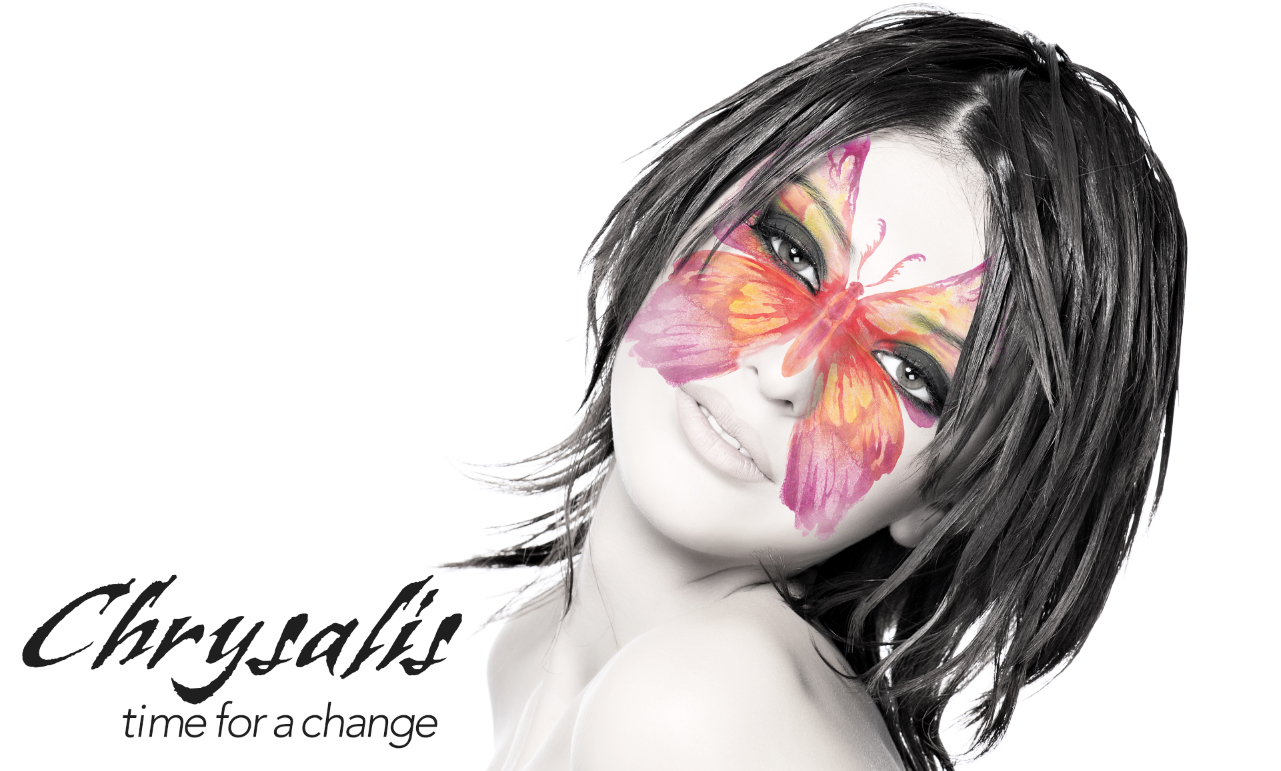
All that is left is to add a little tag line, and you are all done. Easy peasy. Hope you enjoy.

יום שני, 25 בינואר 2016

יום ראשון, 24 בינואר 2016
יום שבת, 23 בינואר 2016

How It's Made Strawberry Flower | Fruit Carving Garnish | Strawberry Art | Party Garnishing
More Pictures: http://paulartcooking.blogspot.co.uk/2016/01/how-its-made-strawberry-flower-fruit.html
Learn How It's Make an Edible Strawberry Flowers with the step by step instructional video, and you can create your own that will blow your mind and "WOW" Your Family & Friends. They'll Love Your Amazing Creations :) Good luck everyone and Happy Learning!
Recommended What to Watch:
Art In Strawberry Flowers | Strawberry Art Red Flower | Fruit Carving Strawberries Garnishes https://www.youtube.com/watch?v=j4N1nZBjEuI
Art In Strawberry Turtles | Fruit Carving Garnish | Party Food Decoration | Italypaul.co.uk https://www.youtube.com/watch?v=kqHJoISIfck
Art In Strawberry Penguins | Fruit Carving Garnish | Strawberry Art | Party Garnishing https://www.youtube.com/watch?v=lVaVLLjNzU8
How to Make Banana Decoration | Banana Art | Fruit Carving Banana Garnishes https://www.youtube.com/watch?v=NmSBRDftEFw
How It's Made Apple Penguins | Fruit Carving Garnish | Apple Art | Party Garnishing https://www.youtube.com/watch?v=MhjQ4xZHzoA
HOW TO QUICKLY CUT AND SERVE A WATERMELON BIRDS!!!!!
https://www.youtube.com/watch?v=UKxCGk27ibc
Art In Banana Dolphins | Fruit Carving Garnish | Banana Art | Party Garnishing https://www.youtube.com/watch?v=ZhzIj9hqURA
Art In Apple Flower | Fruit Carving Garnish | Apple Art | Party Garnishing https://www.youtube.com/watch?v=4__D0XdFT9Q
The Art of Vegetable and Fruit Carving
© Original works by ItalyPaul
http://www.italypaul.co.uk
יום שישי, 22 בינואר 2016

יום חמישי, 21 בינואר 2016
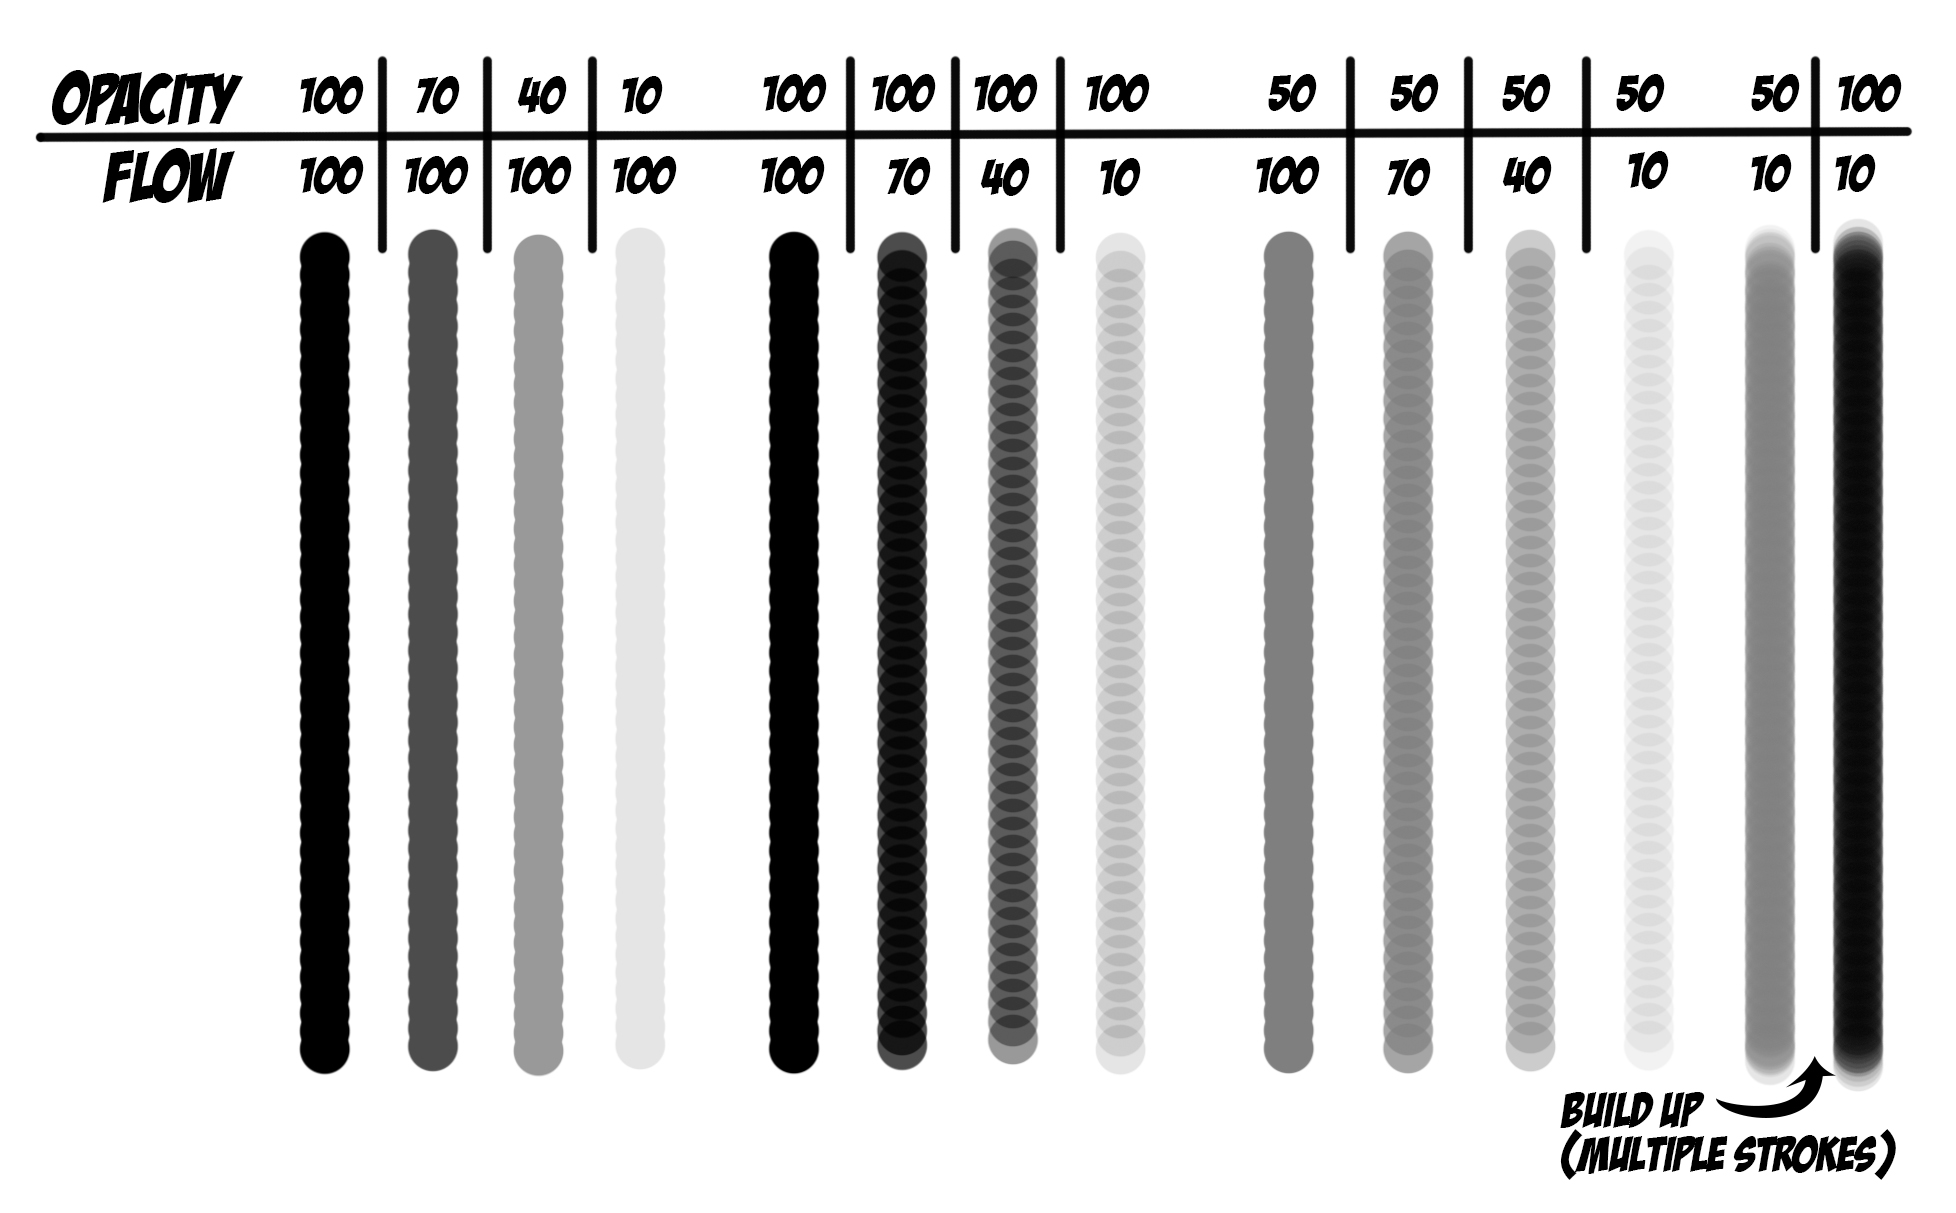
Flow vs. Opacity
Do you know the difference between the Opacity and Flow sliders when using the paintbrush tool?
Here is a quick illustration to show what is happening.
Opacity sets the ceiling of darkness or opaqueness… Flow sets the speed that the color is applied. Think of Flow like dialing the amount of water coming out of a faucet. 100 per cent gives you all of the color in one shot, while lower Flow allows for lighter lines that will build up to the Opacity ceiling. Hence the last two lines in the example below show what happens when you keep building up with a Flow of only 10 per cent. So when you want to draw light lines and then have them build up, sort of like a pencil… setting a low Flow rather than Opacity will give you better results. Once you try it, you will get it and it will be a great addition to your skill set.

יום שני, 18 בינואר 2016

יום ראשון, 17 בינואר 2016
יום שבת, 16 בינואר 2016


יום שישי, 15 בינואר 2016
יום חמישי, 14 בינואר 2016
Puppet Master
So here's is a fun little project you can do with your kids or really anyone that you may want to control…ahem, I mean impress.
Just a couple of simple techniques will have you done in no time… no strings attached. 

Start with an image that will work for the puppet master... hands out

Add a second image with the person in a usable pose with arms doing something

Resize the second image to be "puppet" size

Now add the control rods... any type of wooden or metal rod can be used

Use the Pen tool or line tool to draw lines from the ends of the rods to the hands and feet

Don't forget to add a little string around the ends of the rods

Draw lines for the mouth and joints. To add realism draw a second line at 50% opacity on the edges to give extra depth

Final image
And there you have it… quick and easy, but can be used for a number of applications… but I personally like to do this to my kids with me pulling the strings… 'cause I like to pretend I am in charge. 
תכנון קירות ירוקים - ריצרד רוזנבאום -
הקמת גינה אנכית
VerticalGardens.com
קונספט חדשני להקמת גינה וורטיקלית מאפשר לבנות גינה ללא קרקע.
מגובים בשנים של ניסיון בתחום, ותיכננו פרייקטים רבים מהם אפשר להתרשם באתרנו.
קירות ירוקים יכול לשמש לגינה אורגנית או גינת נוי, בבתים קטנים או בבתי עסק לקשט את תוך הנכס או מחוצה לו.
יום רביעי, 13 בינואר 2016
Puppet Master
So here's is a fun little project you can do with your kids or really anyone that you may want to control…ahem, I mean impress.
Just a couple of simple techniques will have you done in no time… no strings attached.
Start with an image that will work for the puppet master... hands out
Add a second image with the person in a usable pose with arms doing something
Resize the second image to be "puppet" size
Now add the control rods... any type of wooden or metal rod can be used
Use the Pen tool or line tool to draw lines from the ends of the rods to the hands and feet
Don't forget to add a little string around the ends of the rods
Draw lines for the mouth and joints. To add realism draw a second line at 50% opacity on the edges to give extra depth
Final image
And there you have it… quick and easy, but can be used for a number of applications… but I personally like to do this to my kids with me pulling the strings… 'cause I like to pretend I am in charge.
הירשם ל-
תגובות (Atom)